A few weeks ago I was buzzing around the net when I
stumbled upon an image that made my little quilty heart explode with happy rays of sunshine. If you click that link and stare for a few moments you will understand how one can fall in love with such a beautiful thing. Now I have to tell you that I in particular, am a fan of folded things. I'm not too sure WHY but I am and I love them and so this was a natural heart stopper for me.
After the love set in, I set about tracking down a tutorial for this little gem and I found a few odds n sods here and there but had to use the two I found to put it all together. After posting a few images of my finished work, I was asked a ton of questions so here you go: a tutorial and your questions asked at the same time :)
I'm going to start small, as I feel that once you have the hang of how to layer and combine, you can make anything from it! I made a quilted circle that is sandwiched with Insulbrite so it can be used as a hot plate, or as a decoration. So, here is what you will need to get started:
- 1/4 yd fabric for each color you intend to use (note: if you use larger circles, you'll need more fabric so make sure you consider your circle size here!)
- Fat Quarter worth of backing fabric
- Fat Quarter worth of scrap fabric (make it as ugly as you want- you will never see it again once we're done!
- Fabric Marker
- Cutting Board
- Rotary Cutter and/or Scissors
- Iron and Ironing Board
- Bias Tape
- Something to make a circle with. I used a small dessert dish.
- Thread, Needle, Sewing Machine, Stick Pin
- Quilt batting, interface and/or Insulbrite depending on what you want to use this for.
- PATIENCE and a nice bevvy :)
Ready? :) If you like crisp flat fabric, iron it all right now. I hate ironing so I don't do it until I NEED to do it. (Please excuse me as all my bad habits are about to be aired!)
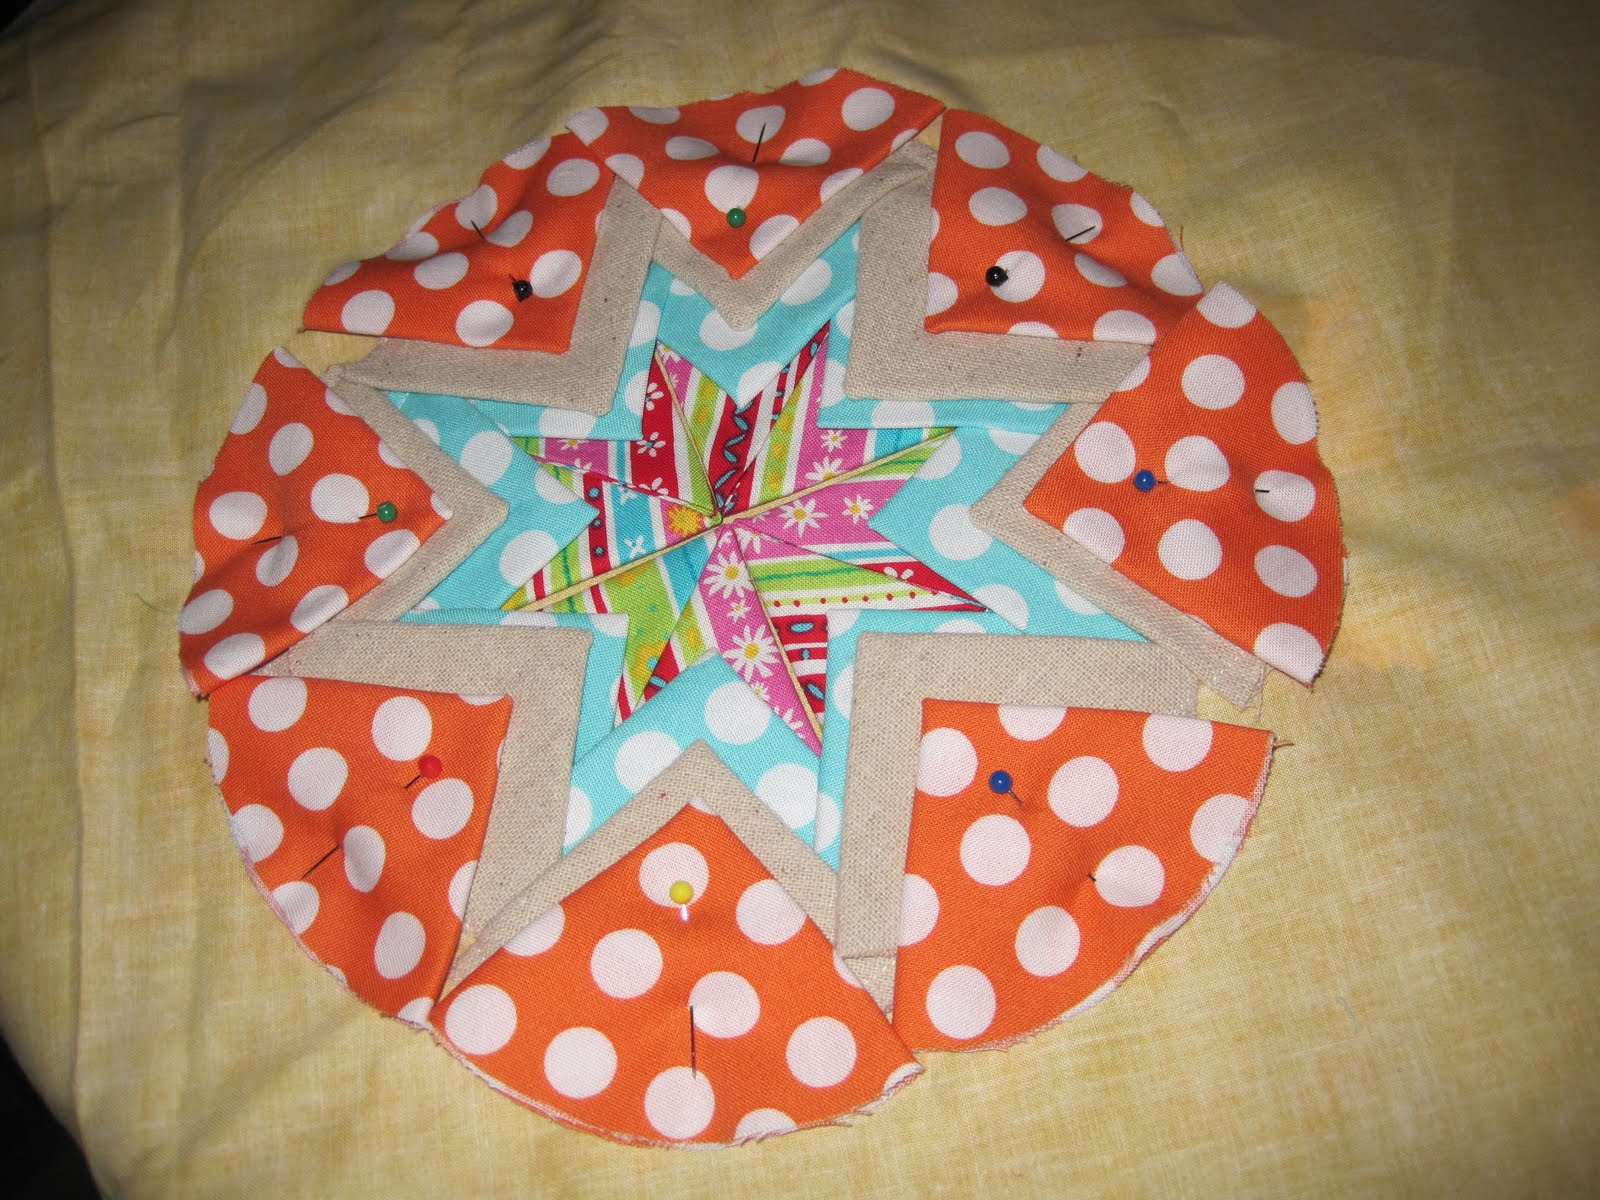
On the wrong side of your fabric for the circles, you want to take your circle maker (dish/cup/lid/circle template if you want to get really fancy) and start drawing circles. The center fabric, which is the focal point of the piece, requires 4 circles. The next layer takes 8 circles. The third layer takes 8 circles, and then from there you can decide how you want to layer them but I used 16 circles for the 4th and 5th layers. The bigger you make it, the more you will need as you move out from the center. My circles were a 4.5" diameter.
If you love scrappy bits, you will get a lot of them from this project depending on how you lay out the traced circles. You can see above that I staggered them to get more bang for my buck. This process of tracing and then cutting takes a good bit of time. I traced on a large surface, and then sat on the sofa with a movie playing and my scissors and snipped away to get my circles all done.
Next, we're going to plug in my nemesis the Iron, and iron away. Get your scrap fabric and your stick pins ready. You want to start with a single circle and iron it flatter then flat. Do not skimp on the ironing and be VERY picky about the folds you are about to make. If you want it to look crisp, pointy and even, be really careful when doing this part of the project. Its the most important part (in my opinion). So, iron the circle flat. Then fold it in half with the wrong sides together, make sure it's even and perfect, and then iron it super crisp.
Then, use a straight pin to mark the center of the fold. You are going to fold each side of the circle into the half mark to create a point on the folded line.
That sounds confusing so look at the pictures!
One side will look like this (above) and the other side will look like the one below.
If you are satisfied with your folding and ironing job, and have a nice even, crisply ironed round back triangle piece, repeat that step with all your circles. They should be ironed to the point where they sit like that naturally. If you do not do that, they will make you insane for the next steps. Trust me! If you make one that isn't exactly right, spray it with a mist of water, iron flat, and repeat until it's perfect. This will take you some time, and certainly every last ounce of patience. Also, if your circles have a bit of an uneven edge (some of mine did) don't panic. The backs of the circles are all covered up so what matters is that the folds and the points are perfect, or as near perfect as you can get them.
Next, you need your scrap piece of fabric. I like using a big one because it makes me feel like I have options once I start layering these puppies. I'm only doing 5 layers for this tutorial, but you may want to do 10... or more... so make sure that what you have in mind is going to fit on your scrap fabric.
At the center of your crap fabric, take your 4 focus fabric circles and pin them together making a circle. You can decide if you want the split side up or the flat side up. Make sure they form a perfect circle, and sit tight together. Here is a little tip that I figured out that was not in any of the tutorials I read. Use your needle and thread and make little stitches on the back side to hold your center circle points in perfect place so that the center stays EXACTLY as it should. These little stitches should stay invisible from the front of your piece. I did this BEFORE I stitched around the outside of the circle. You may chose to do it after but regardless, you should do it to keep your points perfect at the center. Once you have stitched the points down and they lay like you want them too, hop on your machine and as close to the edge as you can, stitch around the outside of the circle. I used a straight stitch the first time, the second time I used a zigzag. You pick what you are comfortable with.

You can see above my stitch running around the circle, and notice that it's not perfect, or SUPER close to the edge. You just want to make sure that secure the circles down. As you add layers, you won't be able to clip every piece of the circle edges unless you sew in a tight and precise scalloped pattern. I didn't because I was comfortable with what I was doing but you may choose to.
Here is the tricky part. How you choose to layer your circles is entirely up to you. I liked the split side down when I did mine, but a lot of people like theirs split side up. If you look at the original image that inspired me she really took some time to control how the splits added to the overall pattern. I suspect she also used circles of varying circumference. I'm not that talented just yet so I like the simpler approach. If you're an advanced sewer, please leave me a comment and tell me how you altered this with varying circle sizes because I want to know!!
Anyway, I eyeballed it from here on out. You may want to pull out a measuring tape and let that be your guide. For layer two, I centered the next round of circles on the middle of each flat side of the center circles. For layer three, I centered the circles on the previous layer. See the image below to clarify what I mean. Remember that after you are done with EACH LAYER you want to sew around the outside edge to make sure the layer doesn't move.

For the next two layers, I centered my circles on the dips and peaks of the previous layer, and I also varied the distance of each piece to add variety. You may want to keep is as simple as you can for the first attempt at this because it gets crazy trying to layer and measure. You need to make sure it's as symmetrical as possible, so please pay attention to your measurements. My brain naturally finds dimensions and can accurately eyeball things like this with very little variation. I also like quirky sewing when it comes to certain things. If you do not have that natural or trained ability, or do not like variation and slight skews to your sewing, use that measuring tape and pin pin pin to make it accurate. You'll thank me later when it's bias tape time.

This is before I adjusted some pinning but you can see how I varied the distances in some of the circles in the layering. Be careful doing this. Your last layer of circles will have to be placed in opposite positions to get back to a round shape and not end up with an oblong shape. The orange layer is half done up there as well. I did my final layer in a particular fashion which you can see below.
Once you are done with your layers, and are satisfied with how everything has built up, it's time to trim. I cheated and used a dinner plate. I'm not kidding! I wanted to ensure I was as round as I could so first I trimmed it sort of close, then added in the Insulbrite and the backing fabric and pinned it all together.
Then I quilted it.
Note: You do not have to quilt it if you do not want to. I felt I needed to for what I was doing with it and therefore, did so! The original inspiration piece is NOT stitched. I suspect she used smaller circles then me so hers probably lay tighter then mine did.
Trim trim trim! Get it to the size you want it, get rid of the junk. I HIGHLY suggest that you find something sturdy and round in your house (like your dinner plate!) and trim this with something perfectly round. The stitching on your edges dictates how thick your bias tape edge will be in your finished piece- if you stitched too far in you will have a thicker edge to hide it....
Finally, use your bias tape to edge it. Cheaters beware- this is a circle and so you will HAVE to use proper bias tape. If you do not, and think you are saving your fabric by not edging properly (sneaky you!) you will get bunches and an uneven edge and you will be unhappy.
My personal tastes for this piece was that I ended up stitching orange threads on the edge because it was destined for a place where that sort of decorative stitching belongs. So, I will show you a different piece that is more conservative!
The rest is taste. I like a wide edge, some people like narrow ones. Your call.
Please let me know how your piece turns out and if you find you need any clarification in these steps!! I'm curious to see what you create so let me know!
As a special note: Thank you for those that sent me messages following the horrendous storms that flattened my little corner of Georgia. My family and I, our friends, our extended family and our neighbors are all safe and sound with minimal damages. I live 20 miles to the community of Ringgold GA which as many of you know, is pretty badly damaged. My doctors office, which was there, is no longer standing. The little chapel we got married in is pretty damaged as well. It's heartbreaking. My little family has done many donation and outreach things over the past few days and while the devastation is severe, the hearts of these southerners are great and beautiful. They will overcome this with the help and the kindness of the people around them and so to you, a big thank you for all your thoughts, and prayers, for our community.